
How to make the perfect DIY sandals on your first try (Huaraches)
- Vitória
- Oct 22, 2023
- 9 min read
Updated: Jan 10
Making your first DIY Sandals can be nerve-wracking. See my tips to do it right the first time round!

Photo of me hanging out with a tree, in my beloved Xero sandals
Table of Contents
My first DIY sandals
Xero Shoes' FeelTrue DIY Sandal Kit was my first experience with barefoot "shoes". They are inexpensive, extremely versatile and customizable to your taste. Making your DIY sandals for the first time is very fun but it can also send you down a spiral of doubtful thoughts like "Oh no, what am I doing?, Am I going to ruin them on day one? Help!".
For the first pair of DIY sandals I made, I was lucky to have help from someone who has made many a pair of sandals before and it would have been wonderful if I had listened to all the expert advice available to me. Alas, I only listened to most of it but now, almost two years later and a couple of other pairs of sandals later, I see what I could have done better the first time round. So if you are looking for some reassurance that you can do it, here it is. You can do it and you can do it right! :)
Before we go further, let me introduce the sandals. Xero Shoes offer two options: the DIY FeelTrue Sandal Kit and the Classic DIY Sandals with Vibram Cherry soles, both offering an excellent array of lace colors to choose from. In this article, I discuss how to make both.
DIY FeelTrue Sandal Kit


The FeelTrue kit is a little easier to get started with: choose your kit size based on your foot length and you will get a wide base to start with, that already has the two holes needed in the ankle area. All you will have to do is punch the third hole between the toes and the lacing. Plus, you may want to trim the outsoles (the remaining sole material you don't need around your toes), which can be tricky - we will come back to this later. See Xero's guide for making FeelTrue sandals here.
Classic DIY Sandals with Vibram Cherry Soles


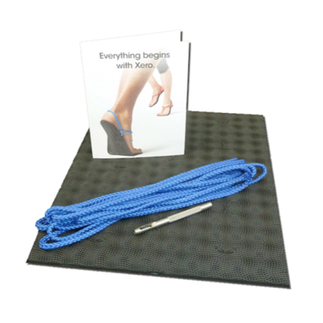
This kit is 100% DIY. The sole material comes in different sizes you can choose from: a rectangular "blank canvas" on which you will draw your foot shape, cut it out and punch the three holes before proceeding to the next steps - lacing and maybe trimming the outsoles. See Xero's guide for making this type of sandals (huaraches) here.
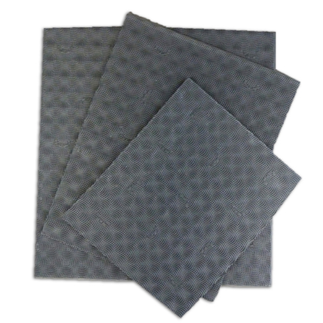
Sole thickness

FeelTrue soles come in two different thicknesses: 3 or 6 mm. I have the 6 mm soles (on the right, in the picture) and have used them for everything I want sandals for: walking in the city and in nature, hiking, swimming and even running. They are very sturdy and have not disappointed me so far. I am impressed by their versatility. I have never liked or used a pair of sandals so much.
Vibram Cherry soles are 4 mm thick and they are a lot more flexible than the 6 mm FeelTrue soles, you can immediately notice the difference. The surface in contact with the ground is very grippy. Regarding the surface your foot is in contact with: the Vibram Cherry soles are super comfortable and are even nicer than the FeelTrue soles, the contract surface is extremely comfortable, it really feels like you are barefoot or wearing very cozy socks. This is not a full product review though, so keep in mind I am just referring to how both soles feel on the foot and their adherence to the ground (both great!).
Now, let's go make those perfect DIY sandals on your first try!
Advertisement:
Tip #1 - Follow the Xero guides, but not so fast
Xero Shoes has two detailed, step by step guides to help you make your DIY sandals: one for the FeelTrue sole, and another for the Vibram Cherry sole. The guides are very helpful but I still advise a bit of caution. Since we don't know what we are doing (yet) and we are eager to make the coolest-ever sandals, some people (such as myself) may cut too much of the outsoles! The best approach is to first, read the full Xero Shoes guide from beginning to end, but don't touch your sandal kit yet, put that scissors away!
Take the Xero Shoes guide as a starting point and read the points below, where I give you my tips and suggest a change or two.
Tip #2 - Vibram Cherry Soles: 100% DIY with no foot outline and no holes yet
Steps 1 to 6 of the Vibram Cherry sole guide describe how to trace your feet to make your sandal cutouts.
Cut around the tracing. That is, cut on the outside of the line you’ve drawn, rather than ON the line. Again, that little extra bit can help make sure the finished product is comfy. Plus, you can always remove material from your huarache sandals and make them smaller, but you can’t make them bigger, so err on the side of too big.
Indeed, let's start with too much material and avoid the risk of not having enough material later. I advise you to start with an even bigger sole than what is suggested in the guide.
How I made my Huarache outlines:
I bought the Large Kit Vibram Cherry Soles, even though I have quite small feet, hoping I could make two pairs of sandals out of it. It worked out, now I have a pair of back-up soles!
I put together a few sheets of regular A4 paper, making it the same size as my Vibram kit.
I puzzled out different ways to make both my feet fit twice in this area and found a good result.
I cut the biggest outline possible for each of the four foot shapes.
I marked and cut the toe and ankle holes as described in the guide. I may have marked the ankle holes first but I don't think the order matters. As long as you keep your weight on the foot you are marking, you should be fine.
From here onwards, I will focus on the FeelTrue guide as a reference point.
Tip #3 - Draw a generous foot outline
Tip #3 covers my advice on steps 1 to 3 of the guide. No matter which DIY kit you are using (FeelTrue or Vibram soles), place your feet on the base sole. If you verify you do want to trim the outsoles, here is what to do next.
If you have the FeelTrue soles, you don't need to draw the outlines yet, but you can.
If you are using the Classic kit: trace your foot and even it out generously. You want to have a spacious sole because these soles can serve you well for a very long time, and your feet shape will likely change over the years.
Don't cut your final sandal outlines yet. :)
Tip #4 - Mark the toe hole
Let's switch some things around: my goal is to cut with caution. The Xero Shoes DIY FeelTrue sandals guide suggests you cut out the outsoles (if you do it at all) before punching the toe hole. I advise you to do any cutting as late as possible in the process, because cutting too much of your outsole is an easy mistake to make and you cannot take it back.
Outline of the Xero Shoes step by step guide | Outline of my step by step guide - a safer order |
|
|
I want to point out an important piece of advice from the Xero guide, on how to correctly mark the toe hole:
If there’s a gap between your 1st two toes, put the mark slightly closer to the 2nd toe than right in the middle of the space between the toes.
The part of the lace that will keep the front of your foot in place runs from between your 1st and 2nd toes to the outside of your foot. As you walk or run, it is normal that the lace shifts in the direction of your 2nd toe, because your foot naturally wants to shift toward the inside of the sandal. The lace wants to rest on the second toe, more than it wants to be between two toes.

Tip #5 - Punch the toe hole now
Give it all you've got. The soles are very sturdy (the 6 mm FeelTrue soles especially), so take a hammer to the hollow punch provided by Xero with your DIY kit, and give it your best shot!
Tip #6 - Prepare your lace ends
With the "bobby pin method", there is nothing you need to do to prepare the lace ends.
Tip #7 - Thread the lace through the toe hole and secure it
I like to use the "bobby pin method" but it does not always work for me. When it doesn't work, I use the tip of a somewhat blunt pencil to force the lace through the hole.
I use the "Figure 8 knot" and make sure I tie it quite flat. Then, I pull the lace from the top of the sandal, putting the knot in place before using the flame: with a lighter, I slightly (or more generously) melt the knotted lace and I press the sandal onto the ground (ideally outside of the house) to secure its flattened, melted shape. I thread the lace through the ankle holes as described in the guide.
Tip #8 - Select one of the fun tying styles
So far, I have only used one style - I am super happy with it, although there are many ways to do it!


Tip #9 - Cut out the soles
Congratulations, you made it this far! Are you ready to turn your - currently - funny looking sandals into a near perfect, yet very spacious, outline of your feet? Let's do it. As mentioned above, avoid cutting too much. This will not be the final trim. In the pictures below, you can see that I got carried away with the scissors when I cut my first Xero sandals.
I cut the soles way too close to the feet. It looked good back then but almost two years later, my feet have changed - they are wider (my muscles became a lot stronger and more prominent) - and now my first pair of Xero sandals is not as wide as my feet and toes. The soles are still in excellent shape despite heavy usage, but unfortunately I cannot grow the edges of the outsoles back. Before cutting anything, see the bonus tips below.


Advertisement:
Bonus tips
Learn from my mistakes, don't skip these!
Do not try to make the perfect sandal outline right now. Cut the soles in a way that makes them comfortable enough to walk in, but leave the outsoles still as spacious as possible.
Use your sandals. For two weeks or more, just use them, get comfortable walking in them! The 6 mm soles in particular will mold to your feet to an extent, so you will get a much better outcome if you trim your soles after this precious adaptation time. This time is also required to get the hang of the right lacing tension or tying style, initially you will have to adjust them a few times, until it feels just right.
Do not cut your laces shorter! I thought I had plenty of lacing to last years, so I cut a good part of it - big mistake. True, the Xero laces are robust and very long, but that extra length is not dead weight. Hold on to every bit of it, tie the full laces into your sandals in a creative way and thank me later. When your toe knot disintegrates, you will redo the lacing and here enters the hero of the day: your long lace.
Pro tip: I use a Japanese bonsai scissors to cut the 6 mm FeelTrue soles. I have not been able to find a scissors more powerful than that and trust me, you need a powerful scissors to cut these soles!
Have fun with your DIY Xero Sandals
That is it, thank you for reading and have fun making your Xero DIY sandals! Do take a look at the resources listed below, for a short bullet point list to help you in this endeavor. If you have any tips of your own, I would love to see them in the comments below!
Resources
Take advantage of the great videos and images on Xero's DIY sandal guides:
Blog by Xero Shoes with lots of interesting articles
If my blog has helped you in any way, consider using my links for your purchases. When you use my link, I may receive a small commission at no extra cost to you. For details, see my Disclaimer.


コメント